特定のページのみ特定のCSSを読み込ませる
やりたいこと
特定のページ(今回はサイトのTOPのWelcomeページ)のみ特定のCSSを読み込ませたい。
HOWTO
① 特定のページ用のlayoutを作成する
/app/views/layouts/welcome_layout.html.erb
② コントローラーに使用するlayoutを明記する
class WelcomeController < ApplicationController
  layout "welcome_layout" # ->これ

  def index
  end

end
③ /config/initializers/assets.rb に以下を記述
Rails.application.config.assets.precompile += %w( welcome/creative.css )
Rails.application.config.assets.precompile += %w( welcome/creative.min.css )
Rails.application.config.assets.precompile += %w( welcome/style.css )
④ welcome_layout.html.erbに以下を記述
<%= stylesheet_link_tag  'welcome/style', media: 'all' %>
<%= stylesheet_link_tag  'welcome/creative', media: 'all' %>
<%= stylesheet_link_tag  'welcome/creative.min', media: 'all' %>
※ <%= stylesheet_link_tag ‘application’, media: 'all' %>は記述しないこと
⑤ サーバー再起動
Vagrant開発環境でメールサーバを立てる
やりたいこと
普段Vagrant上でRuby on Railsのアプリを開発しています。
ユーザー認証にDeviseを使っていてサインアップの際、開発環境でアプリからメールを送りたい場面があったので、今回MailCatcherを使ってメールサーバをVagrant上に立てました。
※ 今回VagrantのIPアドレスは192.168.33.60としています。
HOWTO
1.Gemをインストールする
※ アプリで使う他のGemと衝突する恐れがあるため、Gemfileには書かない。
$ gem install mailcatcher
2.以下をenvironment/development.rbに記述
config.action_mailer.delivery_method = :smtp
config.action_mailer.smtp_settings = { :address => "localhost", :port => 1025 }
config.action_mailer.default_url_options = { host: '192.168.33.60', port: 3000 }
3.MailCatcherを起動する
$ mailcatcher --http-ip 192.168.33.60
Starting MailCatcher
==> smtp://127.0.0.1:1025
==> http://192.168.33.60:1080
*** MailCatcher runs as a daemon by default. Go to the web interface to quit.
4.ブラウザからアクセスする
5.ルート画面からサインインし、メールが送られると、コンソールに以下の文言が表示される
Sent mail to programming_girl@hoge.com (10.1ms)
Date: Wed, 05 Oct 2016 09:56:34 +0900
From: please-change-me-at-config-initializers-devise@example.com
Reply-To: please-change-me-at-config-initializers-devise@example.com
To: programming_girl@hoge.com
Message-ID: <57f44fc21f0f5_1cfc3f81bcda37ac325df@develop.mail>
Subject: Confirmation instructions
Mime-Version: 1.0
Content-Type: text/html;
 charset=UTF-8
Content-Transfer-Encoding: 7bit

<p>Welcome programming_girl@hoge.com!</p>

<p>You can confirm your account email through the link below:</p>

<p><a href="http://192.168.33.60:3000/users/confirmation?confirmation_token=WPTMz1JQJm3gx4YxCfSt">Confirm my account</a></p>

Redirected to http://192.168.33.60:3000/
Completed 302 Found in 200ms (ActiveRecord: 12.4ms)
6.ブラウザ見るとこんなかんじ
本文に確認URLがあるので、Pushする。

あるいは5の文言中のconfirmリンクをブラウザで叩く
http://192.168.33.60:1080:3000//users/confirmation?confirmation_token=79y3We4KFXSMzExiEqsx
7.ログイン画面に遷移するので、ログインする
git configの値の設定
はじめに
いつもいつも値のユーザー名やメアドの設定方法をググっている気がするので、備忘録(´・ω・`)
コミット時のユーザーを設定するよ。
設定の確認
$ git config --global --list

user.name=programming_girl
user.email=programming_girl@hoge.com
core.excludesfile=~/.gitignore
core.pager=less -R
core.editor=vim
color.ui=auto
pull.rebase=true
push.default=current
include.path=~/.gitconfig.local
値の設定
$ git config --global user.name programming_girl
$ git config --global user.email programming_girl@hoge.com
Vagrant Share でHTTPS通信する
1.Vagrantfile記述
2.オレオレ証明書を発行
① 証明書の発行
# On Vagrant
$ yum install mod_ssl openssl
$ openssl genrsa -out ca.key 2048
$ openssl req -new -key ca.key -out ca.csr
② 決められた場所に各ファイルを配置する
$ cp ca.crt /etc/pki/tls/certs/
$ cp ca.key /etc/pki/tls/private/
$ cp ca.csr /etc/pki/tls/private/
③ /etc/httpd/conf.d/ssl.confに以下を記述
SSLCertificateFile /etc/pki/tls/certs/ca.crt
SSLCertificateKeyFile /etc/pki/tls/private/ca.key
④ /etc/httpd/conf/httpd.confに以下を記述
Listen 443

LoadModule ssl_module modules/mod_ssl.so

NameVirtualHost *:443
#
#
<VirtualHost *:443>
    SSLEngine on
    SSLCertificateFile /etc/pki/tls/certs/ca.crt
    SSLCertificateKeyFile /etc/pki/tls/private/ca.key
    <Directory /home/vagrant/www/public>
        AllowOverride All
    </Directory>
    DocumentRoot /home/vagrant/www/public/
    ServerName myfirst.test
</VirtualHost>
3.Vagrant Shareする
Vagrantが立ち上がっている状態で以下を実行。
$ vagrant share --ssh --https 443
–ssh:シェアする人がSSHでVagrantに入れるようにする設定
–https {{ポート番号}}:Vagrantfile内で定義したdeveliop.vm.network 'forwarded_port', guest: 443, host: 8443の guest の値
文字化け問題の解決
問題
開発している環境(Vagrant上)で以下の問題が発生。
① viしたときに日本語が文字化けて見える
② git diffしたときに日本語が文字化けて見える
①の解決方法
$ vi ~/.vimrc
---- .vimrc追記内容 ----
set encoding=utf-8
set fileencodings=iso-2022-jp,euc-jp,sjis,utf-8
set fileformats=unix,dos,mac
------------------------
$ source ~/.vimrc
②の解決方法
$ echo "export LESSCHARSET=utf-8" >> ~/.bashrc
$ source ~/.bashrc
git の pager が less コマンドを使っていて、その文字コードが utf-8 に設定されていないことが原因。
.bashrc に LESSCHARSET の環境変数を追加。
Vagrant Shareを使ってみた
Vagrant Shareは、ローカルで立てたVagrantの環境へ誰でもアクセスできるようにしてくれます。
まぁとりあえず使ってみよう。
HOW TO
1.ATLASの無料のアカウント作成
https://atlas.hashicorp.com/account/new
2.ローカルのVagrantを立ち上げる
$ vagrant up
3.コマンドライン上からログインする
$ vagrant login
You are now logged in.
4.共有できるURLを発行する
$  vagrant share
==> default: Detecting network information for machine...
    default: Local machine address: 192.168.33.20
    default: Local HTTP port: 80
    default: Local HTTPS port: disabled
==> default: Checking authentication and authorization...
==> default: Creating Vagrant Share session...
    default: Share will be at: slight-fox-6296
==> default: Your Vagrant Share is running! Name: slight-fox-6296
==> default: URL: http://slight-fox-6296.vagrantshare.com
5.共有をストップ
Ctrl + C
割り振られるURLは毎回違うようです。
Vagrant Shareがお名前解決してくれてるということかな。
すんばらしい〜!
おまけの妄想
AWS構築|Let’s Encrypt で レッツ暗号化
なにするの?
AWSにのっけたWebサービスをHTTPSでアクセスできるようにする。
HOW TO ENCRYPT on AWS
1.Apache停止
$ apachectl stop
2.Certbotをダウンロード
$ git clone https://github.com/certbot/certbot
3.Certbotの実行(証明書の取得)
$ cd certbot/
$ ./certbot-auto certonly --standalone -d kpter.net -d www.kpter.net --debug
※ AWS上では--debug つけないと文句いわれちゃう
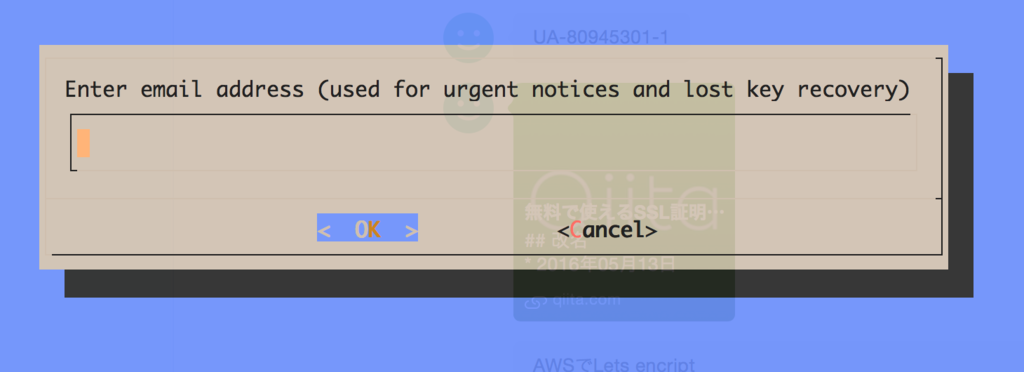
3.5.Emailアドレスの入力

途中、メールアドレスの入力を求められる。(緊急時の通知や鍵をなくした際の復旧用)
↓できたっぽい。
Requesting root privileges to run certbot...
  /home/ec2-user/.local/share/letsencrypt/bin/letsencrypt certonly --standalone -d kpter.net -d www.kpter.net --debug
Version: 1.1-20080819
Version: 1.1-20080819

IMPORTANT NOTES:
 - Congratulations! Your certificate and chain have been saved at
   /etc/letsencrypt/live/kpter.net/fullchain.pem. Your cert will
   expire on 2016-10-16. To obtain a new or tweaked version of this
   certificate in the future, simply run certbot-auto again. To
   non-interactively renew all of your certificates, run
   "certbot-auto renew"
 - If you like Certbot, please consider supporting our work by:

   Donating to ISRG / Let's Encrypt:   https://letsencrypt.org/donate
   Donating to EFF:                    https://eff.org/donate-le
4.Apacheの設定いじる @ /etc/httpd/conf.d/ssl.conf
- 証明書 /etc/letsencrypt/live/kpter.net/cert.pem
- 秘密鍵 /etc/letsencrypt/live/kpter.net/privkey.pem
- 中間証明書 /etc/letsencrypt/live/kpter.net/chain.pem
<VirtualHost *:443>
   ServerName kpter.net
   DocumentRoot "/var/www/html/KPTer-web/lp"

   SSLEngine on
   SSLHonorCipherOrder on
   Header set Strict-Transport-Security "max-age=31536000; includeSubDomains"
   SSLProtocol -All +TLSv1 +TLSv1.1 +TLSv1.2
   SSLCipherSuite HIGH:MEDIUM:!aNULL:!MD5

   SSLCertificateFile /etc/letsencrypt/live/kpter.net/cert.pem
   SSLCertificateKeyFile /etc/letsencrypt/live/kpter.net/privkey.pem
   SSLCertificateChainFile /etc/letsencrypt/live/kpter.net/chain.pem
</VirtualHost>
※ ssl.confに書かないと以下の警告が出た
[warn] _default_ VirtualHost overlap on port 443, the first has precedence
5.Apache再起動
$ apachectl start
以上で完成です!